Wednesday, February 29, 2012

Just a quick post about some of my favorite white things.
First and foremost.
White bed linens,
The crispy ones from Rachel Ashwell's shabby chic line at target.


 And the texture of her white chenille patchwork quilt.


 I adore.

White table linens


White Pitchers


White slipcovers
and vintage white chenille blankets
with a splash of color

And pretty white garden gates 

What's your favorite white thing?
Join in with me at the party held by Kathleen

Monday, February 27, 2012

Project 11 & 12 Decoupage French Ad Coffee Tray & Nautical Table

This old night table got a little bit of a change. I printed out some old map graphics that I found on the Graphics Fairy site and I gave her a nice French Grey chaulk paint.


 I used modpodge to fasten the maps and then when that was dry I covered the top in a thin coat of laquer for protection.

Now this is a table befitting a home at the shore.

Here it is when I found it.. the before. someone had given up on her.


Below is another very simple project of decoupage which is one of my favorite art mediums.

I came across one of those vintage trays for holding pyrex casserole dishes, and wanted to spruce up the bottom for use as a coffee table tray. I chose a graphic from The Graphics Fairy and printed it out on 2 pages.


Then applied modpodge to the tray and decoupaged the paper print out onto the tray. You have to smooth a lot to release air bubbles.
When it is all dry, another coat on top for protection and it is done!

I hope you like them, and give it a try,

Joining these blog parties
Brag Mondays
Between Naps on the Porch
Creative Me Mondays
Making the World Cuter
Nifty Thrifty Tuesdays


Thursday, February 23, 2012

Project 10 of 2012 Distressed Desk

I know at this point you may be tired of reading post about Annie Sloan chalk Paint. But i am passionate about the whole concept of making it easier to distress a piece of furniture. And Chaulk Paint does that.

Before Annie came out with the white that is currently offered, I was trying different things that I read about on the blogs for making your own chalk paint, simply because I wanted white, not off white or beige, but a nice bright white.


The formulae I like the best is 2 parts flat paint.. ( or eggshell finish if you have it and are in a pinch)
 and one part plaster of paris. It actually is a little less than that but you'll figure out what concistancy works best for your technique!
So here is my latest victim before I attacked, which I gave a peek at in my last post.
Well you can see I had begun by the right hand corner leg. I really have to retrain myself to not be so excited and stop for a second to take some before photos.
I am definately a jump right in the water kinda gal.

So what'ya been up to?


Places I  pop in to party this week are below:


Decorating Insanity

Tuesday, February 14, 2012

One wall of my studio/ guestroom and another booth

Holy toledo, it's been eleven full days since I posted anything. I have been very busy.
I finally got most of the guest room/ studio finished. I'm just revealing one wall today. The office area/ craft closet.
I have been using this room to pay my bills, blog, and to do small crafting. The banner of old hankies is my Valentine's touch. I plan to use my photos on canvas here. They are mostly beach shots.


I am temporarily using this vintage lacy tablecloth instead of a closet door,
 but I like how it looks and might keep it.

This wall before I took over this room, just after my son moved out. He bought his own house. I really should get around to posting some of the renovations he did there, as well.
But back to this room. Here is the before of this particular wall.
Below is the sketch I drew up in September, and this is the wall on the left of that sketch.
My idea sketch of that wall... so things are coming along , a bit at a time.
More of that before room and the idea plan back in September's post here
I like how it is coming together from things I pretty much had somewhere in the house, just re-use, and recycling! Just trying to create a pleasing look with things I already have.

Except I did recently buy those hankies!


Another item I spent some time on is this pretty little suitcase table I made at the Beach House with a few coats of paint!


 I also decided in late January to open another booth at the antique mall, North End Antiques, Cape May NJ
Last posting I did was about dressing the window there, for Valentine's Day, and now I decided to take the spot by the window. So I will be having lots of fun dressing that window for every Holiday!
Lots of projects that I had to get busy on for that room!
I have sold 3 desks since I opened my 1st booth in mid October so I figured I better paint another desk!

Lucky we had some sunny days and I worked this from the garage.
Half way through I remember the before shot.
And another frenchy nite table I was glad to get my hands on below.

And a peek at it all finished and distressed


Just above it I put an old window, with some vintage hankies, in a banner,


and next to that is an old high chair I painted which was the perfect spot for some vintage vases with roses,

 for a little Valentine's display.
I love old crates, especially hanging on the wall so I put a few up,

 my favorite one says Cape Cod and it is an old cranberry crate!
So that is the one wall of my new booth.


More to come, lots of other painting projects, and that desk I finished, later.
Happy Valentine's Day to all!
Partying here:
Nifty Thrifty Tuesday
Primp your Stuff!
Tuesday's Treasures

Friday, February 3, 2012

Project 8 and 9 The Bureaux and the Fruit Stand

Annie to the rescue! Annie Sloan paint that is. Moi did the hard part. The luggin and paintin and sandin.

This lovely bureaux needed a bit of help to shine.
this is her now


Below is how she use to look.
The top was ruined from some pieces of paper that had been left to soak wet clear into the finish


 and two wheels were missing.. so she stood like some say I do... with a leen to the side! ....

Get it? Eileen.... yeah I know. I get it all the time. Dopey joke. :)
That's why you see books propping up her front feet.
But she was a great size dresser and had loads of potential so I snagged her up and transformed her to a sweet vintage piece. Even her drawers are sliding smooth as silk.


And the fruit stand was a side of the road save, I thought she was a farmhouse cutie patutie the minute I saw her, all upside down, legs outstretched . Her muffled cry for help.


I think with a generous helping of Annie Sloan grey, she worked out to be the perfect little beachy display stand.

So on to the next project I go!
Sharing with these linky parties.
Vintage Inspiration Fiday
Furniture Feature Friday
Feathered Nest Friday
Saturday Night special
Nifty thrifty Tuesdays

Thursday, February 2, 2012

Valentine Heart from coffee filters Tutorial

This Valentine Heart decoration is very easy to make but it will take a little time.
 It makes a nice window display.


You will need these items.


  • poster board
  • knife or scissors
  • coffee filters (4 for each rose)
  • green frog tape
  • red food dye
  • a bowl to hold roses as they dry


1. Cut a heart out of poster board. I like to use a bowl to form the top portion and cut with an exacto knife or scissors.


2. Fold 2  filters  in half, then in quarter, then in 1/8th


and Cut 2 different size petals out of four filters

3. Open
 then fold in half now with scallops overlapping

4.Start to curl the small cuts in on an angle, from the center of the filter

 keep curling

 separating the filters, a little with your finger as you go, and keeping tight at the bottom  center point.

5. Curl the larger cuts in around the small ones the same way.
 curling 2 larger filter petal cuts around your two smaller  filter petal cuts.

6. Secure with frog tape at center bottom


7. Push down on the petals a bit with your finger to bend and make more realistic

8. Mix a few drops of red food dye into a glass of water and paint a little on to each petal, separate and bend petals a little more

9. Let dry sitting up... I place them in slits cut  in aluminum foil covered bowl


10. Bend your frog taped end a little,  and glue with hot glue gun and press to poster board.

11. Rim the entire edge of the heart with the roses you painted with red food dye and water.


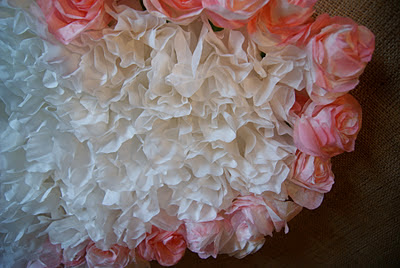
12. For the interior I simply pinched white filters and glued them down one by one
  If you look closely you can see the interior is not formed roses,
It is just pinched filters for a wonderful effect.


And this is the end result.
If you just glue a ribbon on the back you can hang it on your door, or anywhere in your home.
Mine is currently decorating a window in  the North End  antique mall in Cape May NJ
I am going to have to get busy and make another for my front door!
Show and Tell Friday
creative-me-link
Related Posts Plugin for WordPress, Blogger...

speak to me!

I read every one of your comments, and appreciate them so much. Thanks for stopping by my blog :)